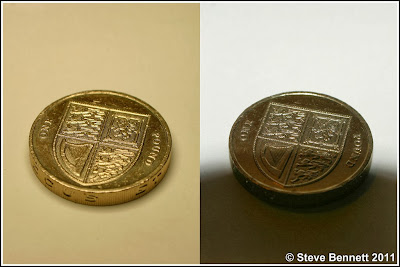
Anyone who has tried shooting close up or macro using the pop up flash on top of the camera might have encountered this problem at some time. When working distance is very small (usually in millimeters with high magnification) the lens blocks the light from the flash, casting a shadow of it on the subject and ruins the shot. This is more pronounced with longer lenses or with a close up attachment, as I had fitted here.
 |
| diy flash extender |
In the example given above the first picture (on the left) is taken using our diy flash extender and the one on the right is taken without it.
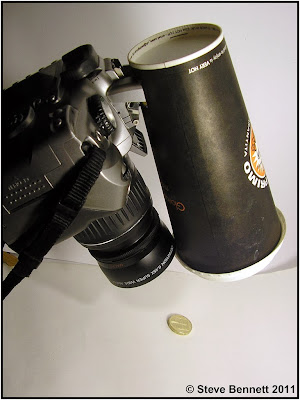
A quick fix solution to the problem is to extend the flash forward, so it provides light near the end of the lens. To extend the flash what I have used is a simple disposable paper coffee cup attached to the pop-up flash. This brings the light source forward and by leaving the domed plastic cap on the cup, provides a diffused light source close to the end of the lens.
This is how the set up looks.
 |
| diy flash extender for macro photography |
Our diy flash extender is made from a paper coffee cup, cut a hole on the side of the cup near the bottom. The hole should only be large enough to let the pop up flash head in.
Probably worth mentioning, I have not used anything other than gravity to hold the cup on the camera here. In a studio situation, nothing more is really needed. But if going out and about, a couple of rubber bands will hold it in place. I use one around the base of the cup and hooked under the eyecap on the viewfinder, with a second around the lens and cup.
When we compare the 2 shots there are some obvious side effects to our techniques. Firstly, the amount of light is reduced, which is not such a bad thing when working in this close as you have plenty of flash power. The second is that due to the reduced light and the fact that the light is passing through the plastic lid of the cup, there is also a strong color cast to the picture. This is easy to fix by setting a custom white balance to match the light, or in editing afterwards; no big deal if you shoot RAW. I left it unaltered here to show the effect.
For longer lenses you will need some attachment that is longer enough to get the light where you need it (a Pringles can could be a good choice if you could find a way to cut through the metal base of the can).
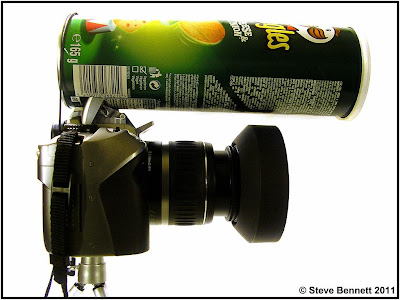
Have been playing a bit more with extending the pop-up flash for close up work and decided to do a comparison between using a paper coffee cup and a Pringles tube version.
 |
| diy flash extender for macro photography using pringles can |
Hopefully this shot shows how simple this is to do. The only modification required to the Pringles tube, is to cut a hole for the pop-up flash to fit into. On my Canon, the hole is a 45mm by 20mm rectangle, though you might need to vary this for different cameras. Then it just slots onto the top and is retained at the rear by a rubber band which is hooked under the rubber eye cup on the viewfinder to hold it securely in place.
As can be seen, this is a bit long for use with the 18-55mm kit lens on the camera and for really close macro work, may cause problems. A little further away though, it works fine, as can be seen below.
 |
| pringles can macro diffuser result |
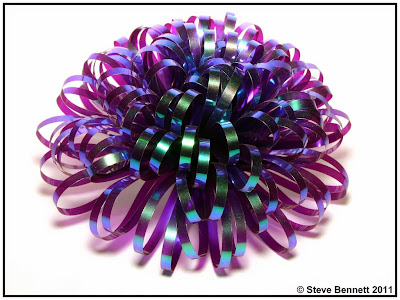
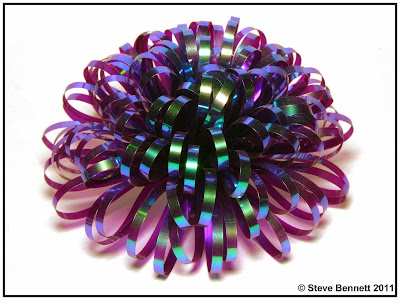
A giftwrap ribbon rosette being used as a test subject for an extender on the cameras pop-up flash. This one is taken with a Pringles tube placed on the flash to bring the light source forward and diffuse it.This prevents a shadow being caused by the cameras lens when working in close and also softens the shadows which are typical when using the on-board flash. It should be noted, that the addition of the tube does introduce a very slight hint of color to the image, but that is easily dealt with by using a custom white balance setting, or correcting in editing which was done here. The color shift is less with the Pringles tube, than with the paper cup version of this.
Also shown below, is a similar shot taken with a paper coffee cup version of the extender for comparison.
 |
| paper coffee cup macro flash diffuser result |
Hopefully this will be useful to some of you.
Related Reading
- DIY Flash Modifier
- DIY Flash Diffuser for Macro Photography Made from Coco Cola Cans
- How to Make a DIY Ring Flash Video Tutorial