Evaluating Coins as a Photographic Subject
Though small when compared to other photographic subjects, coins are three dimensional sculptures with depth, dimension and texture. These characteristics should be borne in mind when thinking of coins as a photographic subject; the photograph should do justice to the look and feel of the coin, reveal the shape and texture. To achieve this one should give specific attention to how a coin is it; one should also consider the various properties of shiny metals and how light behaves when it strikes such a surface before attempting to photograph coins.
The most common mistake beginners commit when attempting coin photography is to think of coins as flat objects and photographing them using flat bed scanners. A scanner could give sharp recognizable images but the results are always flat pictures without much depth or dimension and it could never do justice to the look and feel of a good coin. If your intention is to photograph the coin in the best way possible you should use the right equipment, the right kind of lighting and technique.
In this article we will discuss photographic equipment, various lighting setups, controlling the lighting using various light modifiers etc and their effect on the photograph.
Equipment Requirements for Coin Photography
Any digital camera with good close up shooting (macro) capabilities could be used to shoot coins; however for maximum control over different aspects like choice of shooting angles, control of depth and lighting it is recommended to use a DSLR camera and a dedicated macro lens which could produce life size (1:1) magnifications.
Photographing Coins using the Camera’s Built in Flash
Generally on camera flash is a big no no for most subjects as such a small light source, placed so close to the camera lens, produce a flat, unflattering effect. But coins are a bit different, due to the high magnifications needed and the very short working distance the built in flash would act as if the light is coming from a little farther away from the lens.
On the other hand, most digital cameras do not do a good job of throttling down a flash for such short-range shooting. This leads to severe overexposure, especially of a highly reflective coin. Also, because of the short distance, the light falloff from one side of the coin to the other can be too stark, leading to extremely bright and extremely dark areas.
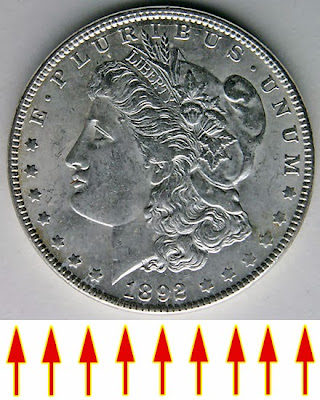
You may have had better luck, but the shot below of an 1892 Morgan dollar is the best I've been able to do with a built-in flash.
 |
| photographing coins using the cameras built in flash |
This was taken with a very capable camera (a Canon Digital Rebel). In order to keep from overwhelming the coin with the flash, I shot in manual exposure mode, setting a very small lens aperture. This gave me a nice, sharp photo, but that's about the only good thing about it.
As you can see, the coin is a bit too bright at the top and much too dark at the bottom. Worse, the harshness of the flash overemphasizes every tiny detail in the coin. Believe me; this coin looks better than this in real life, as you'll see in the next section.
The Direction of Light Affects How a Coin Looks
If you check coin listings on eBay, it quickly becomes clear many sellers never think of their coins as individual sculptures, requiring different lighting approaches. There are many ways for light to affect the look of a coin, but the most important one is the light's direction.
At the very least, consider that many coins contain human faces or figures. Would you light a person from beneath the chin or behind the head? Well, not someone you like, at least.
Let's take a look at that 1892 Morgan dollar again. In each of the following photos, the lighting is provided by a single diffuse tungsten light, at approximately a 45-degree angle to the face of the coin. The only thing different is the direction of the light.
First, with the light striking from the top…
While that's not terrible, and you can see the condition of the coin fairly well, I wouldn't advise lighting your spouse the same way.
 |
| coin photography top lighting setup |
Now, here's the Morgan lit from beneath…
…which I think is just plain ugly. Do not do this…
In fact, I can't think of any instance in which you might want such "Frankenstein" lighting
 |
| coin photography bottom lighting setup |
And I think that lighting from behind the head…
…just shows you were too lazy to turn the coin or the light around.
Of course, this does show off Liberty's cap and hair nicely.
 |
| coin photography back lighting setup |
On the other hand, I think that lighting the lady's face is the right thing to do…
…even if the light is coming from the left side as in this case.
You may not always be shooting a coin with a face, but I think this shows how much a good sense of direction can add to your presentation of a coin.
 |
| coin photography front lighting setup |
A Basic One-Light Setup
In this guide, I'll be discussing a number of different lighting setups and techniques for coin photos, but after talking about this a bit on eBay's Coins & Paper Money discussion board, I've concluded…
no single lighting technique is "best."
Each has its advantages and disadvantages. Some techniques show small surface detail well; others excel at showing luster or toning. In fact, a single eBay coin auction or listing could well use more than one lighting technique, allowing prospective buyers to properly evaluate the coin.
In most cases, a coin can be adequately shown with just one light source. As already discussed, placement of a light source has a lot to do with how the coin will look; but in general, I think a light placed to one side and at a relatively low angle usually works best.
 |
| one light setup for photographing coins |
In this setup, the light is approximately at a 30-degree angle to the coin. Notice it is placed further away than the camera's lens. This helps keep stray light from getting into the optics and lowering contrast.
In all of the setups I am showing, I have my camera mounted on a photo copy stand, pointing downward at the coins. If you don't have such a copy stand, a small tripod would do. However, you will definitely need a firm camera support for maximum sharpness and to do your coins justice. If you will be shooting a lot of coins, I think a copy stand would be a good investment.
The light shown above is a single 150-watt tungsten bulb, mounted in a simple conical reflector to the left of the camera. Adjusting this light to different angles can give different effects. A very low angle will rake the light beam across the coin surface—making design edges, surface nicks and marks stand out sharply. A high angle will increase the reflective shine of the coin. However, this gain will come with some loss of contrast and detail.
 |
| how to photograph coins with a single light |
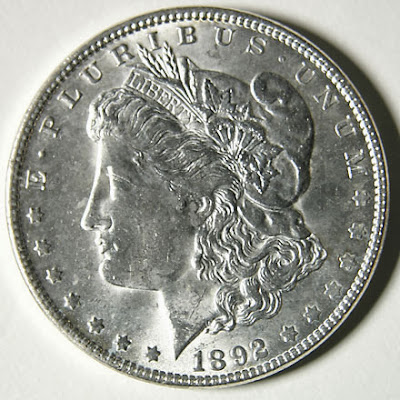
This photo was shot with the light at approximately the angle shown in the setup above and with a bare bulb.
I'm not entirely happy with that shot, because the brightest areas, such as below Liberty's chin, are without detail. At the same time, the harshness of the light actually overemphasized a few small surface defects in darker areas.
All in all, it's a serviceable photo, but it could be improved by diffusing or filtering the light.
High Contrast or Soft Lighting
After lighting direction, the size of a light has the most to do with how an object will look. By "size" I don't mean the power of the light, but rather the physical area of the light source, in relation to the object.
A tiny, point source of light will create bright highlights and deep, dark shadows. This increases the sense of sharpness in a photo, but it can also obscure important factors such as toning or luster on a coin.
A broad light source will reduce the harshness of highlights and soften shadows. While some sense of sharpness is lost, the increased visibility of other details can make this a good tradeoff. Carried to an extreme, however, a very broad light source can make a coin look flat and lifeless.
The distance of the light source matters, too. Although the sun is a very large object, at its distance from earth it occupies less than half a degree in the sky, so it acts like a point source, producing very contrasty light. On the other hand, a small household light bulb placed a couple of inches from a coin can act like a very broad light source.
Choosing between contrasty and soft lighting for coin photography is a subjective matter, but it is easy to get the degree of contrast you want by changing the size of your light source.
Creating Softer Light with a Diffuser
The easiest way to make a light source larger and softer is with a light diffuser. This can be any form of translucent material placed between the light and the subject. The diffuser then becomes the light source, which is now as broad as the lighted area of the diffuser.
 |
| using a diffuser to create soft light for coin photography |
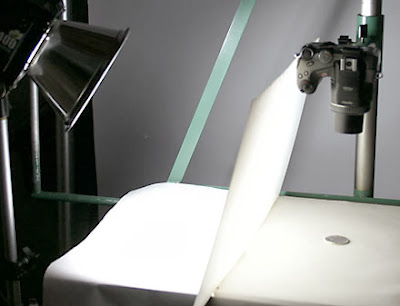
Professional photographers use many fancy types of light diffusers such as scrims and soft boxes, but at the scale of coin photography you don't need anything that elaborate. For instance, you could use something as simple as a sheet of plastic from an overhead fluorescent light, as in this setup.
I propped this plastic sheet against my camera, but you could also mount one directly in front of a light with a simple clamp (being careful of overheating, of course).
This sheet of plastic has now turned my small light source into one that is a full foot square.
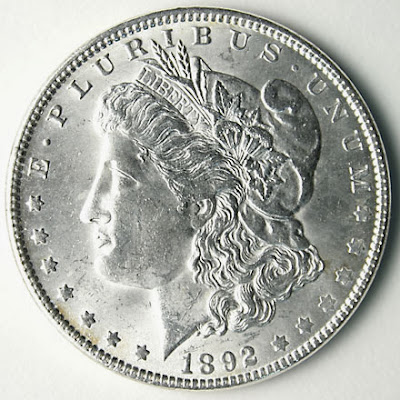
Using the setup above, this photo is the result.
 |
| diffused light coin photography |
To my eye, this is an improvement over the bare-bulb photo I showed above in "A Basic One-Light Setup," but it still isn't good enough. The single light source still gives uneven lighting across the face of the coin and the angle of the light leaves the shadowed areas a bit dark.
Smoother Light - Lower Contrast
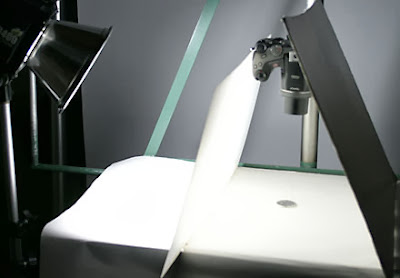
Portrait photographers often use a second light as a "fill" light. Its purpose is to lighten shadows and smooth out image tones. Often, this second light can be provided easily and at almost no cost by a reflector which directs some of the main light back at the subject.
 |
| low contrast lighting setup for coin photography |
At the close distances required for coin photography, using a reflector as your fill light is a cinch and can be very effective. I've added just such a reflector to this setup in the form of a small sheet of foamcore board, which is white on one side and black on the other. Foamcore board is often used in mounting photos and other artwork. A sheet of white posterboard or any other broad and flat white material will work, too.
Notice my plastic diffusion sheet is still on the left, and I have placed the reflector board so it not only leans against the camera but also extends over it a bit. This helps to reflect some light directly back at the surface of the coin.
 |
| using low contrast lighting for photographing coins |
In this photo, the above lighting setup has helped to bring out the luster in the coin while still preserving excellent detail.
It may not be absolutely the best coin photo, but as I said earlier, I don't think there is such a thing. However, I think it is a very good lighting arrangement for most coins.
Light Tents
There are all sorts of light tents promoted on eBay for product photography, including expandable fabric cubes, enclosed boxes and even a "coin dome" specifically for coin sellers. Call them what you will, each is nothing more than a way to completely surround an object with a translucent light diffusing material, providing soft light from all sides of an item. Some commercial light tents cost $100 or more. Thankfully, you can make a very good light tent for coin photos for the price of a gallon of milk. And, you get to drink the milk!
The Milk Jug Light Tent
Creating a light tent from a milk jug requires nothing more than a clean, empty milk jug and a sharp knife or scissors. You simply cut off the bottom of the jug to the desired height, place it over your subject, light it evenly and shoot through the neck of the jug. If the neck is too small for your camera lens, cut it off to make the hole large enough.
Here is one of these modified milk jugs in use on my copy stand…
 |
| diy light tent for coin photography |
I cut this jug down only slightly, but you could easily make a few milk jug light tents of different heights to match the focusing distances needed for various sizes of coins. For even more light diffusion, you could use a white, orange-juice jug.
Here, I've shown the milk jug illuminated by only one light, but it is more common to use two lights, with one on either side. This surrounding lighting creates the most even effect.
 |
| coin photography using diy light tent |
Using the above setup, this photo was shot through the milk jug with one strong light on the left side and a weaker light on the right side. As you can see, this produces a very soft light which brings out the surface of the coin well.
However, a light tent also results in a lower contrast image, with less definition between the brightest and darkest areas. This in turn leads to a loss of fine detail in raised design elements. Small nicks and scratches are also less prominent.
Axial Lighting
Axial lighting is a little-known technique which I think has great application in coin photography. In this technique, the light path travels straight back and forth along the same axis as the direction of the camera lens. Primarily used with microscopes or forensic photography, axial lighting can produce shadowless, yet high-contrast images with startling levels of detail.
Axial Lighting Setup
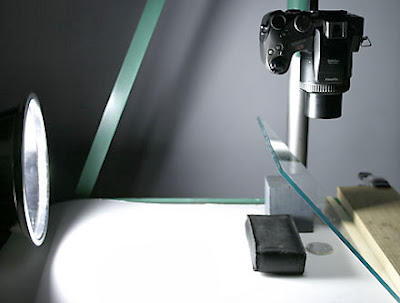
As shown below, an axial lighting setup requires a flat and clear sheet of glass which is placed at a 45-degree angle to both the light source and the camera lens. Most of the light hitting the glass passes through it, but a significant portion of light is reflected downward at the subject—in this case, a coin.
 |
| axial lighting setup for coin photography |
You will notice I've used a small black object to shield the coin from any direct light. I've also darkened the room to avoid any stray reflections in the glass. Therefore, the camera lens sees only the light reflected from the surface of the coin.
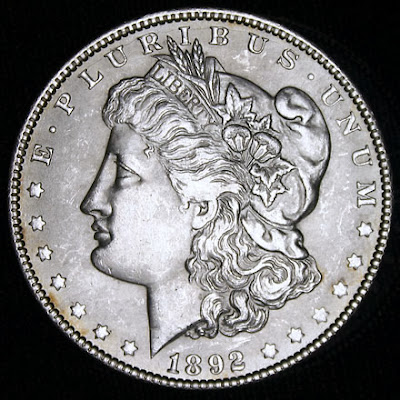
Here is one coin photo I took using axial lighting, with a black cloth used as the background…
 |
| photographing coins using axial lighting |
Any smooth surfaces perpendicular to the light path, such as Liberty's cheek or the raised faces of the coin lettering, reflect a lot of light back to the lens and show up brightly. Any surfaces which are not perpendicular, such as the Liberty's profile or the edges of the lettering, reflect light away from the lens and show up darker. Smooth surfaces (such as the worn areas in Liberty's hair) also show up very brightly while slightly textured areas (such as the lustrous background field of this coin) appear slightly darker.
In other words, there are no real shadows here, just brighter and darker areas, dependent on the angle, texture and reflective characteristics of each part of the coin. I controlled the exposure in this photo so the brightest areas would not wash out entirely. This makes the coin appear darker than it looks in person, but the emphasis here is on detail, not shine.
This high degree of detail can be seen even more clearly in this larger version of the above photo…
Modified Axial Lighting
You can also control and modify the appearance of a coin with small changes in the angle of the reflective glass, causing the light path to be slightly off-axis, as in this example, where the glass was tilted just a couple of degrees more...
 |
| coin photography using modified axial lighting |
As you can see, even a small shift of the light off the primary lens axis loses some of the available detail, but it also restores the lustrous appearance of the coin.
Shooting a Darker Coin with Axial Lighting
Another advantage of axial lighting is that it can increase the contrast in a dark coin, such as an old copper cent. Such coins, shot with traditional lighting setups can sometimes look like featureless blobs, making it hard to see any significant detail. However, axial lighting and a well-chosen exposure can reveal much more...
 |
| Shooting a Darker Coin with Axial Lighting |
In person, this coin is quite dark. To do it justice in an eBay auction, you might want to include both an axial lighting photo and another taken with conventional lighting.
Axial Lighting for Proof Coins
If you'll pardon the pun, the place where axial lighting really shines is with proof coins.
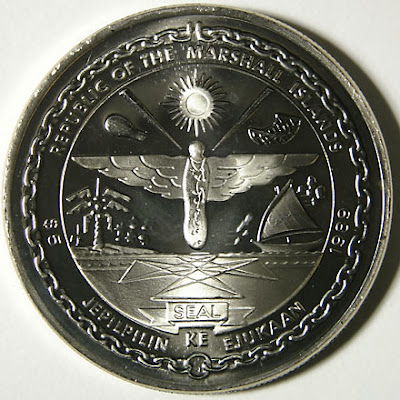
The mirror finish of the fields on proof coins makes them notoriously difficult to shoot. Any light striking such a mirrored surface at an angle will simply reflect away from the camera, leaving behind what look like featureless black pools surrounding the satin-finish design elements.
Here is an inexpensive proof coin, shot with simple side lighting…
 |
| Axial Lighting for Proof Coins |
…And here is the same coin, shot using axial lighting…
 |
| coin shot using axial lighting |
Choosing the Right Lighting for Your Coins
As I said when I started this coin photography series, there is no single approach which is best for all coins. In fact, more than one type of lighting can be used effectively to show different aspects of a single coin. So, I would recommend experimenting with all of these techniques and even to invent variations of your own. The idea is to communicate with people about your coins. For that, a wide lighting vocabulary can be your best tool.
Have Fun : CameraJim's eBay Photography Guide
Related Reading
- Using Axial Lighting for Photographing Coins
- Infinity Focusing – What is it? How does it work? How to manually set a lens without a distance scale to Focus on Infinity?
- DIY Flash Extender for Macro Photography
- Relationship Between F-Stop Numbers and the Size of the Diaphragm Opening Explained
- Making Sense of the Odd Progression of the F-Stop Scale?