Since most of you might have a fairly good idea about what a beauty dish is and what it does; We are not dwelling into those details here.
And for those of my friends who has never heard the term – a short explanation: - A beauty dish is a light modifier in the form of a modified reflector to a normal flash unit which alters the quality of light being emitted from the regular flash, giving it more spread and thus softening the light. Result more wrapping effect as some photographers rightly says.A beauty dish is something that could produce intermediate results between a bare flash and a soft box.
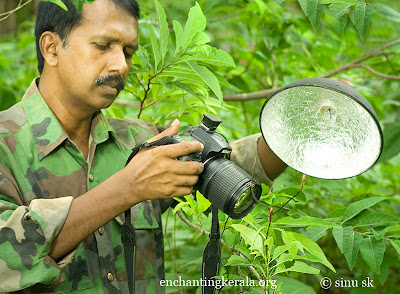
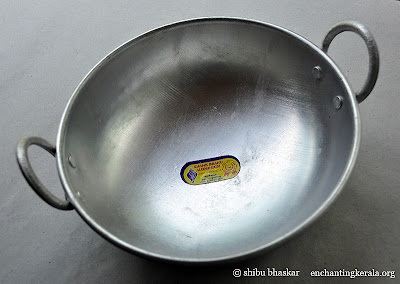
Here in this article we will build a diy beauty dish out of an aluminium cooking vessel. The advantage of using aluminium are many, that it is light weight, has enough strength, does not rust / corrode, easy to work with, easy availability, is not expensive to buy etc. The cooking pan we chose for our beauty dish project has a diameter of 12 inches. It cost us Rs 50/- ($1 and 20 cents).
 |
| Diy Bare Bulb Flash Beauty Dish |
The beauty dish that we are going to make is a bit different from what you have seen elsewhere on the net. Instead of using a primary reflector and using the pan as a secondary reflector, we are going to attach a bare bulb directly onto the beauty dish, giving the light more spread and power than the other method. If we need to diffuse the light further we will later add diffusers that could be easily attached to the front of the beauty dish.
Other than the cooking vessel, we needed a piece of aluminium with which we built the bracket that hold the flash unit firmly onto the beauty dish.
Supplies
- Aluminium vessel (12 inch diameter)
- Sample tin of black board paint
- Aluminium Foil Tape
- Brush to apply paint
- Hacksaw blade
- Driller
- Soldering Iron
- Scissors
- A Precision tool set
We didn’t want our beauty dish to look like a cooking pan once it is finished, so the first thing we did was to remove the handles.
 |
| Diy Bare Bulb Flash Beauty Dish |
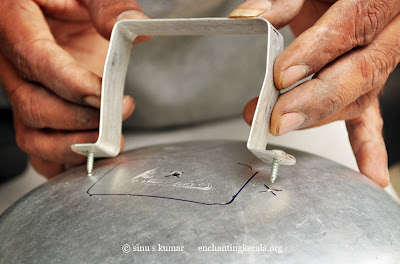
We kept the flash unit which we intended to mount on our diy beauty dish in the centre of the vessel and marked the outline on the vessel. Using the driller drilled a hole in the exact centre of the pan. Then we drilled two holes on either side just on the outside of our markings to fix the bracket.
 |
| Diy Bare Bulb Flash Beauty Dish |
In the picture you could also see the bracket which we made from an aluminium piece to hold the flash firmly onto the beauty dish.
 |
| Diy Bare Bulb Flash Beauty Dish |
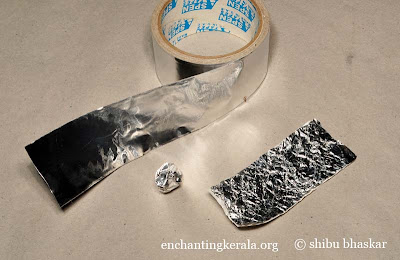
Since our aim is to build a mode powerful beauty dish we need to prepare a highly reflective surface on the inside of the beauty dish.
 |
| Diy Bare Bulb Flash Beauty Dish |
For this we use the aluminium foil tape which is very effective for this purpose. In order to increase the efficiency we first fold the tape and then straighten it before sticking it onto the surface. This way the wrinkles on the surface will act as many small reflectors.
 |
| Diy Bare Bulb Flash Beauty Dish |
The reflector of our beauty dish is now ready.
 |
| Diy Bare Bulb Flash Beauty Dish |
Now that our reflector is ready we need to disassemble the flash. The flash unit we are using for this project is a National flash discarded from the good old film camera days. With national we could just pry open the front glass and access the reflector and bulb; you will have to try a different technique depending upon the type of flash unit you plan to use for the project. Remember to earth the flash and thus fully discharge the capacitor. A flash unit could hold charge even if it has not been used for some time. So take good care and make sure it is fully discharged before proceeding further.
 |
| Diy Bare Bulb Flash Beauty Dish |
Okay, now we have our flash bulb ready to be transplanted.
 |
| Diy Bare Bulb Flash Beauty Dish |
We need to cut only one wire to slip out the bulb from its holder. Once you have the bulb out of the reflector also take out the rubber that holds the bulb from the flash’s reflector.
 |
| Diy Bare Bulb Flash Beauty Dish |
Now we need a holder for our flash bulb, here we are using a holder cut out from an old film box. Mark a similar shape like the one shown in the picture, drill holes on both sides.
 |
| Diy Bare Bulb Flash Beauty Dish |
Cut out the shape from the film box.
 |
| Diy Bare Bulb Flash Beauty Dish |
Insert the rubber on to our holder.
 |
| Diy Bare Bulb Flash Beauty Dish |
The height at which the bulb is fixed inside the beauty dish also affects the quality of light coming from it; we opted for a clearance of 1.5 inches between the dish and the bulb.
 |
| Diy Bare Bulb Flash Beauty Dish |
Once you are sure that everything is in order, glue the plastic holder to the dish, carefully insert the bulb through the hole in the centre of the dish and fix it in the holder.
 |
| Diy Bare Bulb Flash Beauty Dish |
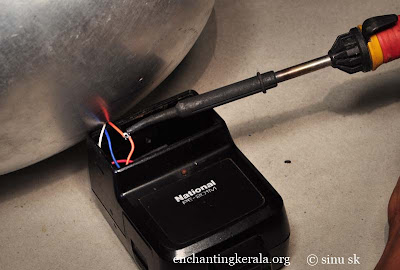
Take out the wire we cut earlier and solder it. If it does not have enough length you may have to attach a small piece of wire. But in our case the original length was sufficient. Once you have finished soldering, insulate the portion properly, affix the flash using the bracket. You may use two small screws to fix it in place or nuts and bolts.
 |
| Diy Bare Bulb Flash Beauty Dish |
Here is an example demonstrating the difference a beauty dish makes to the properties of light coming out from a normal flash unit. The shot on the left is taken with an off camera bare flash (the national flash with which we built our beauty dish) and the one on the right is taken with the beauty dish attached on to the same flash.
 |
| Diy Bare Bulb Flash Beauty Dish |
 |
| Diy Bare Bulb Flash Beauty Dish |
In the next article we will discuss about Photography - DIY - DIY Lamination - How to Laminate photos at Home Without Any Special Equipment