In this tutorial we will see how we can make use of layer masks in Photoshop to create a custom border to your pictures. We will explain the process step by step with screen shots of each step to make it easy for you to follow.
1. Open the Image in Photoshop
Click File > Open or press Ctrl O and open the image in Photoshop
2. Duplicate the Background Layer
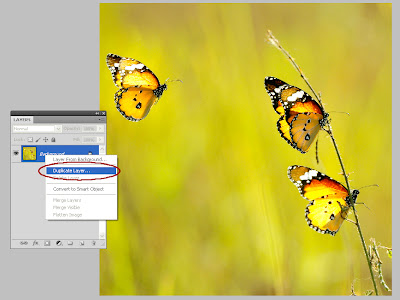
In the layers palette, right click on the background layer and select duplicate layer. The new layer will be named background copy. The purpose of duplicating the background layer is that if the background layer is locked then we won’t be able to add layer masks to it.
 |
| How to Make a Custom Border for Your Photos in Photoshop |
3. Add a Layer Mask to your New Layer
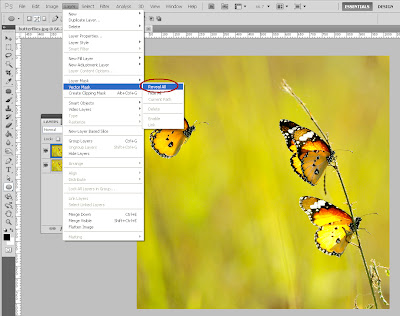
With the background copy layer selected, click Layer > Layer Mask > Reveal All
 |
| How to Make a Custom Border for Your Photos in Photoshop |
4. Select paint brush tool (Keyboard short cut – B)
Select a brush tip of your desired size, you could also control various aspects like the amount of scattering, texture, colour etc.
 |
| How to Make a Custom Border for Your Photos in Photoshop |
5. Hide or Delete the background layer
Since the original background layer is no longer needed you could either hide it or delete it from the layers palette.
6. Select black as foreground color and paint your border.
The area you paint will be erased out; you might have to paint certain areas over again depending on the type of brush and affect desired.
Given below are the results obtained by quickly experimenting with some brushes. You could create various effects by adjusting the controls for brush.
 |
| Photoshop Custom Border |
 |
| Photoshop Custom Border Effect |
 |
| Photoshop Border |
 |
Photoshop Custom Border
|
Congratulations you have now successfully created a custom border for your picture. Save the picture and you are good to go.
In the next article we will discuss about Photography - Post Production -
Creating Soft Focus Lens Effect in PhotoshopRelated Reading


