In one of the previous articles – Understanding Histograms, we discussed what histogram is and how to use it. Let us now see how we could make use of the histogram feature in our digital camera as a light meter.
We have already mentioned in the previous article that there is no such thing as a perfect histogram, only correct histograms representing values for what is in front of the camera. The main purpose of the histogram is to see whether a correct exposure has been achieved or not. The photographer should make sure that there are no clipping occurring at either ends of the histogram (clipping is lost information in either the shadows or the highlights). Since clipped highlights are irrecoverable in digital photography, most camera manufacturers provide an additional feature called Highlight warning (commonly called as blinkies). When the highlight warning feature is turned on, while previewing the image in the camera’s LCD monitor, areas where highlights are clipped will blink, flashing a warning.
The shape of the histogram reveals many important details like whether the subject is dark or light, whether it has an even or uneven distribution of tones, whether the lighting is hard or soft, whether the dynamic range of the scene is within the capabilities of the camera or not etc. As a general rule a histogram representing a correct exposure should not be clipped and should not be too close to the sides. Ideally the histogram should be biased towards the right to get the most out of your digital camera.
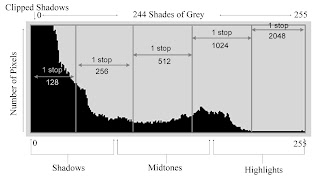
To fully understand this concept let us see how the digital camera sensor records information. The digital camera sensor which is actually a linear device with over 4000 levels of sensitivity uses the first 2048 (50% or half) of the available 4096 levels to record the first stop where the highlight information is recorded. Each subsequent stop records half the light of the previous stop, always using half of the remaining levels. So the next darker stop gets 1,024 levels, the next gets 512, the next 256 and so on.
So getting the maximum result out of your digital cameras sensor requires using a technique often referred to as ‘exposing to the right’ where the photographer tries to get his histogram as far to the right as possible without clipping the highlights. This technique ensures that maximum information is captured by the camera and also the noise levels remain low. However the pictures will almost always look a bit overexposed and need to be corrected in post production to get a more natural looking image.
Modern cameras feature RGB histograms which show separate histogram for the red, green and blue channels, they are extremely useful when you are photographing a scene with a predominant colour. For example when photographing foliage you will be able to tell if clipping is occurring or not in the green channel, this is not possible by looking at luminance histogram.
If you observe closely the camera histogram has been divided into five equal parts by 4 vertical lines, each line is represents a full stop of light. This is helpful to determine the correct exposure or to calculate exposure compensation (increments or decrements) to get the exposure right.
