The Importance of Backgrounds in Photography
Before we dwell into the importance of background in photography let us take a quick look at the definition for background.
 |
| Photo by: Bahman Farzad |
- The ground or scenery located behind something.
- The part of a pictorial representation that appears to be in the distance and that provides relief for the principal objects in the foreground.
From the two definitions given above it is clear that background is what is seen behind your main subject and it is something that provides relief for the main subject. The role to be played by a good background is clear from it. It should complement the main subject and not compete it with for attention.
Background is as important to making a successful photograph as the subject and the camera angle. Backgrounds could make or break a photograph and taking control of the background can help turn a snapshot into a beautiful photo.
Tips for Getting the Perfect Background in Your Photographs
First step to getting better backgrounds in your shots is to be aware of the importance of backgrounds in photography. One should constantly remind himself to pay attention to what is behind the subject during each photography session. This is only needed in the first few sessions or during the beginning of one’s career. After a while it becomes second nature and you will do it automatically in your unconscious mind. Here are some ideas for interesting background treatments that can enhance your subject.
Whenever you are composing a picture pay as much attention to your backgrounds as you give to your main subject. Ask yourselves some simple questions like:
- Is the background too light when compared to the subject?
- Does the background have lines or colors that distract the viewer?
- Is it too messy?
- Does the background grab too much attention?
- Is there a tree or a pole behind someone that would appear as if growing out of the subject’s head? Etc.
Questions like these help you do a series of checks that would ensure you end up with clear backgrounds that perfectly complement the subject. Your main aim is to make sure that the background in your shots is subordinate to your subject in both tone and interest. Now that you have the answers to the above questions let us discuss some techniques to improve our shots.
Choose Your Background Wisely
A creative photographer could easily find many background options for most situations. If the subject could be moved the options are endless and even for subjects that cannot be moved one could try shooting from different angles to get different backgrounds.
 |
| Photo by: Hiroyuki Takeda |
For example shooting from a low angle could help you get the sky as the background and shooting from high up could get you the ground as the background.
Simplify Simplify Simplify
 |
| Photo by: Reinhold Stansich |
Simple uncluttered backgrounds with not many elements or features and very little happening there to attract the visitors attention work all the time. When composing your frame, be constantly on the look out for elements that do not contribute any value to the shot so you can avoid them from your compositions.
Avoids Backgrounds that are Lighter Than the Subject
 |
| Photo by: Renato Targa |
Human eyes are generally attracted to the area of maximum contrast. There are exceptions to this rule; but having backgrounds that are lighter than the subject will often distract the viewers’ attention from the main subject. In most cases backgrounds that are a stop or two darker than the subject work well as this ensures that the area of maximum contrast will be the main subject.
Beware of Lines
 |
| Photo by: Viola |
Lines are everywhere to be found; the horizon, poles, power lines, fences etc are some examples. As a photographer you should always be aware of their presence in your compositions. Lines are very graphic elements and all types of lines vertical, horizontal or diagonal if present in the background could easily divert the viewers’ attention from your main subject. Even patterns that have defined lines can be very unattractive as a background.
Most beginners make the mistake of including competing lines in the background. One classic example is placing the horizon line going through the back of a person’s head.
Throw Background Out of Focus
One of the best ways of eliminating distracting elements behind a subject is to throw them out of focus. There are few things you could do to get smoothly blurred out of focus backgrounds in your shot;
 |
| Photo by: Pablo Carrascosa |
First technique is to use wide open apertures. Everything else remaining the same a wider aperture yields shallower depth of field and thus more blurred backgrounds.
You can further increase the effect by using faster lenses (lenses that have wider aperture openings (smaller f numbers)).
Another way to get more blur in the background is by using longer focal length lenses. Remember when subject magnification is the same (same framing) all focal lengths yield same depth of field at any given aperture. But the image compression afforded by a longer focal length magnifies the blur in the background along with the subject, resulting in more blur; it also has the additional advantage of including less background in your photos due to its smaller angle of view.
You can further blur the background by increasing the distance from the subject to the background. The farther the background is from the subject in focus, the greater the blur.
Colors, Patterns and Textures
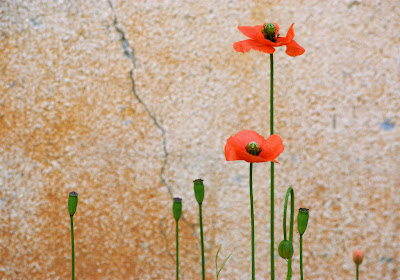
For best results background should have a complementing and pleasing color scheme in relation to the color of your subject. Avoid clashing colors at all cost; either change location or ask your subject to wear a color that matches the background. The rule of clashing colors is applicable in all cases irrespective of the fact whether the background is out of focus or not. A color wheel could come in handy to find out complimenting colors to that of your subject.
 |
| Photo by: Isado |
Similarly when using patterns or textures as background avoid patterns that are too bold, too big or of clashing colors, soft and subtle patterns and textures usually work well.
Make the Background go Completely Black
 |
| Photo by: Luke Ma |
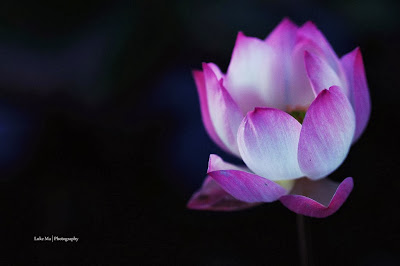
If you find it hard to blur the background using the techniques discussed above you could try rendering it completely black. This is one technique often used by macro photographers. To achieve this you should set your camera to its sync speed. Use low ISO settings like ISO 100, use narrow apertures, light your subject using flash placed in such a way that it illuminates only the subject and no light spills on to the background. This could be done even in broad day light if you have enough flash power close to the subject.
Make Your Own Background
For relatively small subjects and portraits there are many backdrops or backgrounds commercially available. They are available in many shapes, sizes and colors and could be easily folded and assembled making them a favorite of many photographers. These artificial backgrounds could be a lifesaver in many situations when you can’t otherwise find a suitable background for your subject.
Panning
 |
| Photo by: Toni |
When photographing subjects in motion, panning is one technique that could get an impressive background irrespective of what constitutes the real background in panning shots the subject is in sharp focus while the background appears as a blur. One advantage of panning is that you could get blurred backgrounds even using relatively narrow apertures. Panning shots convey a sense of movement making the shots interesting.
Silhouette Your Subject
 |
| Photo by: Girish Suryawanshi |
For subjects that have an interesting shape but is devoid of color and detail the technique of silhouetting them; by shooting into the light (light coming from behind the subject) could make an interesting shot by drawing the viewers’ attention directly to the subject’s shape.
Fill the Frame with Your Subject
 |
| Photo by: Johan J.Ingles-Le Nobel |
In situations where you run out of options; one simple yet very effective technique is to zoom in close and fill your frame with your subject there by completely eliminating background from your shots. No background means no distractions; this technique works really well in portraiture and in wildlife photography.
When Background is Your Main Subject
 |
| Photo by: Andrew E. Larsen |
In case of landscape photography, where beautiful backgrounds are often the main subject, the rules are a bit different. Here the trick to get most out of any scene is to use a narrow aperture to get both foreground and backgrounds in sharp focus; be aware of electric lines, telephone poles etc and compose your frame avoiding those which could ruin a perfect scene.
Replace your Background
 |
| Photo by: Johan J.Ingles-Le Nobel |
In situations where it is impossible to get the right background while shooting, the only alternative available is to replace the background in image editing programs like Adobe Photoshop.
Related Reading
- Using the Foreground to Improve Your Photography Composition
- Using Patterns in Photography Composition
- Using Symmetry to Improve Your Photography Composition
- The Classic Landscape Photography Composition Technique
- Negative Space in Photography? What is it? Why is it Important? How to Make the Most of It?